Cpbiddle
New member
Hello Defender forum! I am new to the forum but have been creeping and learning here for a while. I thought it would be great to do an intro, but more importantly, give back to the forum! I appreciate all the info that I have found here, this is my pay it forward.
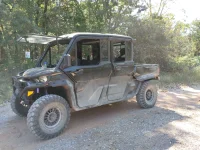
I picked up my Defender new last Summer: 2025 Lone Star HD10 Max, CAB Conversion, Evo Powersports Turbo
Notable upgrades, too many to list:
This project is applicable to 65" HD10 trucks with the Smartlok front Diff and any of the 65" 2026 HD11 trucks that have the front Smartlok Diff. For the HD11s this is a very easy project, and you can probably skip the Master Cylinder swap, which would make this something you can do in just a few hours. Also, you will need at least 15" wheels, or if you use something smaller than 15" I don't know if it will fit.
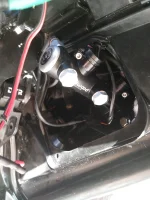
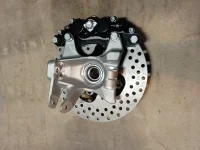
I worked for many months on a solution, but the 2026 HD11 was the key. I first purchased the Wilwood Big Brake Kit Can-Am Maverick X3 / X3 MAX 2017-2024, Item: P1057561 SKU: 10325390. I also picked up the Wilwood 260-16057 Tandem Master Cylinder. You don't need to buy the Master Cylinder from a UTV store, you can pick it up from many different places for much cheaper. Also, ignore the instructions about mounting it level; I contacted Wilwood and it can be mounted in any orientation so long as you first perform a bench bleed (level it in a vice, cycle brake fluid through it until there are no air bubbles).
Here is what it took:
I will post more on this with pics below. Thank you for following along!
I picked up my Defender new last Summer: 2025 Lone Star HD10 Max, CAB Conversion, Evo Powersports Turbo
Notable upgrades, too many to list:
- Evo Powersports DT-195 Turbo
- KWI PDrive XPro clutch with DR3 floated secondary
- 2" Fwd Offset front lower a-arms High Lifter and 2" Fwd Offset front upper a-arm CT Race Worx
- S3 Powersports rear adjustable upper a-arm and CT Race Worx lower rear a-arm - no offset in the rear
- Dirty Teeth Racing Remote start and 2" lift
- Stage 4 Elka shocks
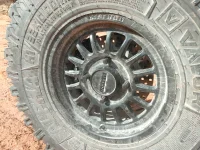
- 32" Valor Alpha tires on Method 411 15" (5+2, but soon to switch over to 4+3)
- MB Quart 320-Watt Stage 4 Can-Am Defender Tuned Four-Speaker head unit, with rear speakers
- Subs: Wetbox audio rear sealed enclosure with 2x JL Audio 12W7, 2x JL Audio 13W7s mounted in sealed enclosures, which are mounted to rear seat frames (removable with magnetic terminals) - 3x HD1200 amps for a total of 3600 Watts, it rocks
- 800 Amp Hour home built LiFePO4 battery pack inside aluminum Tree Dog Kustoms toolbox - to power the subs
")
- Ruff Tuff Seat covers
- Full interior lighting; switch and door ajar controlled floor lights in front and rear, switch controlled ceiling lights, switch controlled rock lights, backup lights, the usual switch controlled front and rear LEDs
- AEM gauge set, with Speedhut speedometer: boost gauge, oil pressure gauge and wide band O2
- PCI Radios center console bracket - converted to rocker switch console. It is awesome; a lot of switches
- Traxter steering wheel shroud with Traxter blinker fob: controls blinker, headlights, brights, even the horn! - this is a great upgrade if you have blinkers since it is a direct bolt on
- Thumper Fab Nerf Rails - they said it couldn't be done with factory aluminum rock sliders, but I used some custom spacers and made some brackets to fit them on. They are great and I kept the rock sliders!
This project is applicable to 65" HD10 trucks with the Smartlok front Diff and any of the 65" 2026 HD11 trucks that have the front Smartlok Diff. For the HD11s this is a very easy project, and you can probably skip the Master Cylinder swap, which would make this something you can do in just a few hours. Also, you will need at least 15" wheels, or if you use something smaller than 15" I don't know if it will fit.
I worked for many months on a solution, but the 2026 HD11 was the key. I first purchased the Wilwood Big Brake Kit Can-Am Maverick X3 / X3 MAX 2017-2024, Item: P1057561 SKU: 10325390. I also picked up the Wilwood 260-16057 Tandem Master Cylinder. You don't need to buy the Master Cylinder from a UTV store, you can pick it up from many different places for much cheaper. Also, ignore the instructions about mounting it level; I contacted Wilwood and it can be mounted in any orientation so long as you first perform a bench bleed (level it in a vice, cycle brake fluid through it until there are no air bubbles).
Here is what it took:
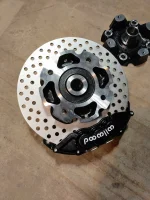
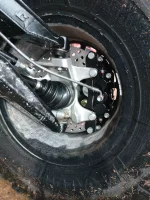
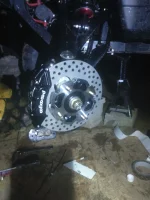
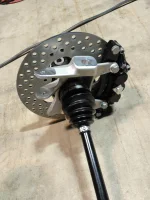
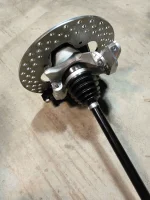
- Wilwood Big Brake Kit Can-Am Maverick X3 / X3 MAX 2017-2024, Item: P1057561 SKU: 10325390. You actually only need a few parts and can likely purchase them from a Wilwood dealer and save significant coin. I will list the parts, but they are the calipers and brackets that mount the calipers to the HD11 knuckles.
- Wilwood 260-16057 Tandem Master Cylinder.
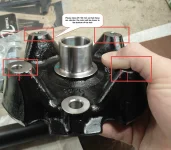
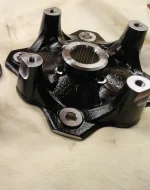
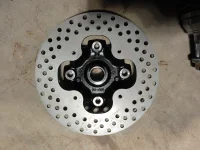
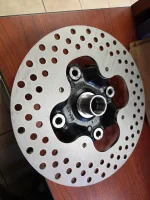
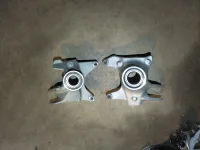
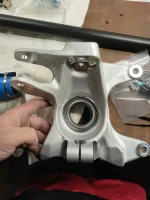
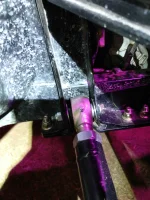
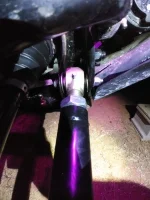
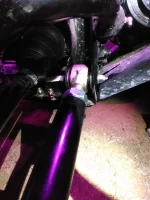
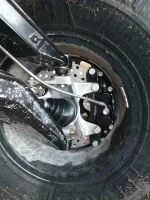
- Replace the HD10 front knuckles with HD11 knuckles. There is a HUGE difference, the HD11 are much more robust in every way and they use the same bearings as the Maverick.
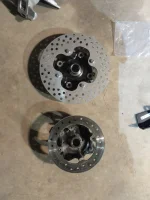
- Replace the HD10 wheel hubs with the HD11s. Same thing, these are night and day different. You will be blown away at how much better the HD11s are. These also use M12 lugs. You will also need to have these machined. More on that later, and there is a place that will do it for cheap so you just need to buy them and send them off.
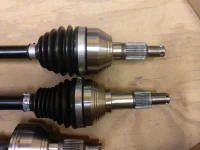
- Replace the HD10 front axles with those from the HD11. Both are 65" and both use the Smartlok Front Differential. If you do not have the Smartlok Diff you have a problem. You will either need to swap out the diff for a Smartlok, or contact Travis Elsbury at Cobra axles to have him make you a set of 65" axles with the HD11 outside CVs. The outside CV is nearly identical to the Maverick, but it is not the same.
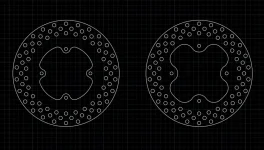
- Purchase custom made 11.25" 1/4" thick stainless steel brake discs from the same place that will machine your wheel hubs. We designed these together and they will have them on file and can crank them out for you for a fair price.
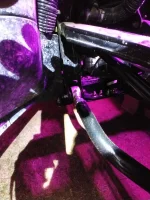
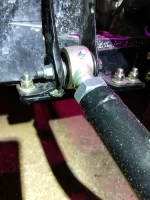
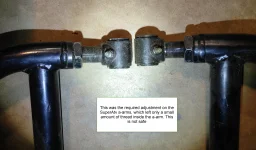
- You will need adjustable lower front a-arms. Specifically, the ones from High Lifter. There are likely some other solutions, such as the Heim a-arms from SuperATV that allow adjustments on both upper and lower. You can bring the top in, push the bottom out. More on this later.
- I suggest the Wilwood 150-40-7812K Smart Pad BP-40 Brake Pads.
I will post more on this with pics below. Thank you for following along!